
Braid Hairstyles
How to Do Your Jumbo Box Braids at Home – 5 Steps

Apr
Box braids are a popular protective hairstyle that has been around for ages. They are known for their versatility and low maintenance, and they can be styled in a variety of ways. Jumbo box braids, in particular, have become increasingly popular over the years due to their statement-making size and bold look. In this article, we’ll walk you through the steps of how to do jumbo box braids, from start to finish.
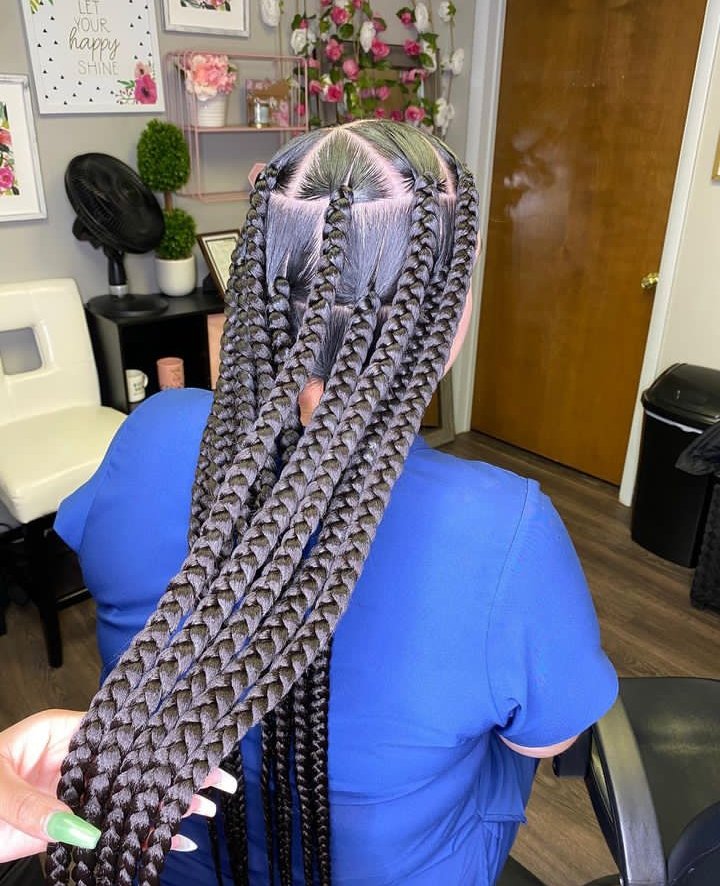
Jumbo box braids are a type of hairstyle that involves creating large-sized box braids. These braids are usually as thick as a pencil or even thicker and can be achieved by using synthetic hair extensions or by using natural hair that is long enough. While the technique of creating jumbo box braids styles is similar to that of regular box braids, there are a few distinct variations that we will explore.
Step 1: Gather the tools
The first step to creating jumbo box braid styles is to gather the supplies needed which include:
- Braiding Hair: You will need several packs of braiding hair. The amount of hair needed will depend on how long and thick you want your braids to be.
- Rat tail comb: This tool is used for creating neat, straight parts for your braids.
- Hair ties: You’ll need hair ties to secure your hair while you’re braiding.
- Bobby pins: These will come in handy for holding sections of hair in place while you braid.
- Scissors: You will need scissors to cut the braiding hair to the desired length.
- Moisturizer and Oil: To keep your scalp and hair moisturized and healthy during the braiding process.
- Beeswax or Edge Control: This can be used to keep your edges neat.
- Hair clips: To keep your hair out of the way while you work on each section.
Step 2: Prep Your Hair
Before you start braiding, it’s essential to wash your hair thoroughly to remove any dirt, buildup, or product residue. Use African Black sulfate-free shampoo to avoid stripping your hair of its natural oils. After shampooing, apply a deep conditioner to your hair to add moisture and nourishment. Let the conditioner sit in your hair for at least 15-20 minutes before rinsing it out.
Using a wide-tooth comb, gently detangle your hair to remove any knots or tangles. Start at the ends and work your way up to the roots to avoid causing breakage or damage.
To make the braiding process easier, it’s best to stretch your hair beforehand. You can do this by blow-drying your hair on low heat or using a heat protectant and flat iron to straighten it.
Apply a leave-in conditioner or hair oil to your hair to keep it moisturized and prevent breakage during braiding. Use a rat-tail comb to section your hair into the desired size and shape for your jumbo box braids.
Step 2: Adding the Braiding Hair
If you’re using your natural hair, you can skip this step and move on to the braiding process.
When selecting braiding hair, choose a brand that is suitable for box braids. The hair should be soft, tangle-free, and lightweight. You can find braiding hair in various colors, lengths, and textures, so choose the one that matches your natural hair or the color you desire.
Kenekalon and X pression braiding hair extensions are recommended quality and affordable synthetic hair extensions. Cut the braiding hair into equal lengths depending on how long you want your braids to be. Make sure the hair is detangled, and any tangles or knots are removed before braiding.
Section your natural hair into small sections and clip them out of the way. Take one section of the braiding hair and fold it in half.
Step 3: Start Braiding
To start braiding, take a section of hair and divide it into three equal parts. Hold the right section with your right hand, the left section with your left hand, and the middle section with your middle finger. Cross the right section over the middle section, then cross the left section over the new middle section.
Now it’s time to add in the braiding hair. Take a piece of braiding hair and place it over the middle section of your hair. Hold the braiding hair and the middle section together with your middle finger, then use your right hand to cross the right section over the middle section and the braiding hair. Repeat this process with the left section.
Continue braiding until you reach the end of the hair. Once you’ve reached the end, secure the braid with a hair tie or a rubber band. Repeat this process for each section of hair until all of your hair is in braids.
To achieve the desired result using the knotless braiding hair technique, make sure to add the braiding hair repetitively until you reach the desired look which should be large-sized braids as thick as a pencil or marker.
Step 4: Finishing Touches
Once you’ve finished braiding all of your hair, there are a few finishing touches you can do to make your jumbo box braids.
- Trim the ends: Use sharp scissors to trim any frayed or uneven ends. This will give your braids a cleaner look.
- Seal the ends: Dip in hot water to seal the ends, and proper care should be exercised while at it.
- Style the edges: Use a small amount of edge control or gel to smooth down your edges and create a sleek finish.
- Add accessories: Add some hair accessories like beads or cuffs to decorate your braids and give them a unique touch.
- Maintain moisture: Apply a leave-in conditioner or oil to your scalp and braids to keep them moisturized and prevent dryness.
- Cover at night: Use a satin scarf or bonnet to cover your braids while sleeping to prevent frizz and maintain their shape.
Step 5: Style as desired
You can wear your jumbo box braids as is, or style them in different ways such as half up, half down, or in a high ponytail.
