
Braid Hairstyles
Feed-In Braids: Everything You Need to Know

Feb
Feed-in braids are a traditional African hairstyle that has gained popularity all over the world. In this article, we will cover the basics of feed-in braids, including tools and products needed, the step-by-step process, and tips for maintaining healthy hair while wearing the style. Whether you’re new to braiding or looking to update your hair game, this guide will help you master the art of feed-in braids.
What are Feed-in Braids?

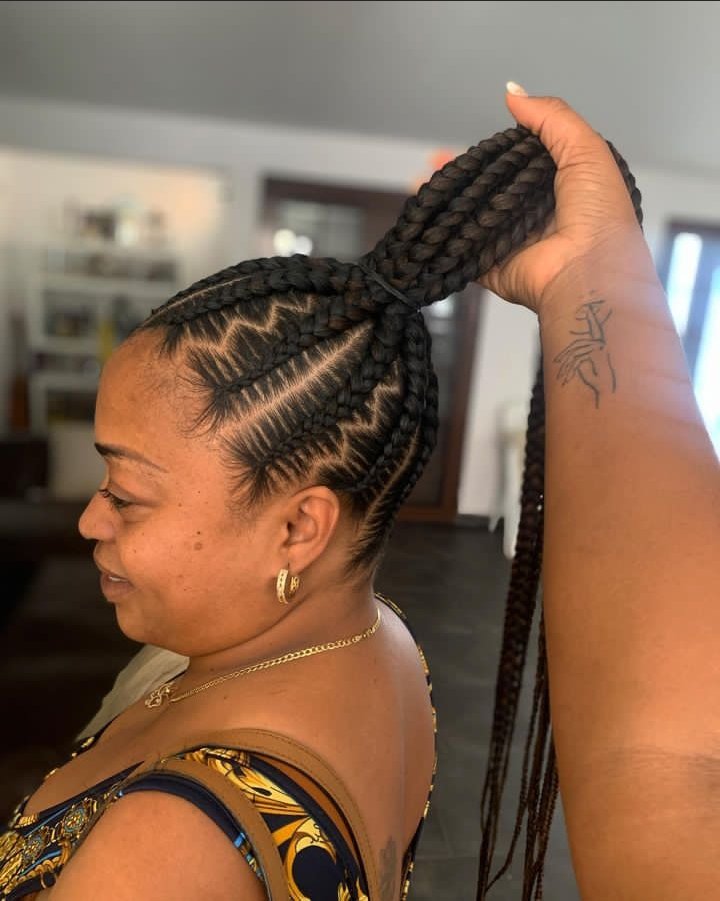
Feed-in braids are a popular hairstyle that originated in Africa and has been used for centuries by people of African descent. They are created by braiding hair from the roots, gradually adding in more hair as the braid extends.
This technique creates a neat, tight braid that resembles a cornrow. The feed-in braid technique is the method implored for the knotless box braid styles which is a beautiful tweak from the regular box braids.
The feed-in braids gained popularity in the United States during the Civil Rights Movement as a symbol of pride and cultural heritage. Today, feed-in braids continue to be a popular hairstyle among people of African descent, as well as those of other cultures and are often used as a protective style to help promote healthy hair growth.
Benefits of Feed-in braids
Feed-in braids offer several benefits, including:
- Protective styling: Feed-in braids protect the hair from damage by keeping it tucked away, allowing it to grow out without being disturbed.
- Low maintenance: The braids are low maintenance, as they require little styling and can last for several weeks with proper care.
- Versatile: Feed-in braids come in a variety of styles and can be customized to suit different hair lengths, textures, and preferences.
- Time-saving: Installing feed-in braids can be a time-saving hairstyle, as they can last for several weeks without needing to be redone.
- Comfort: Feed-in braids are a comfortable hairstyle, as they do not pull on the hair or put excessive tension on the scalp.
- Budget-friendly: Compared to other hairstyles, feed-in braids are a budget-friendly option, as they can last for several weeks without the need for frequent touch-ups.
- Cultural significance: For people of African descent, feed-in braids hold cultural significance and are often seen as a symbol of pride and cultural heritage.
How to do Feed-in Braids: A Step by Step Guide
Here is a step-by-step guide for feed-in braids for beginners:
Step 1: Preparing Your Hair
Before you start braiding, it’s important to make sure your hair is properly prepared. If your hair is dirty or oily, the braids won’t hold as well. To prepare your hair, wash and condition it, then apply a leave-in conditioner to help detangle any knots. If you have naturally curly hair, you may want to blow dry it straight to make braiding easier.
Step 2: Parting Your Hair
Once your hair is prepared, you’ll need to section it into rows. The size of the sections will depend on how thick you want the braids to be. For smaller braids, part your hair into smaller sections, and for thicker braids, part it into larger sections.
Step 3: Starting the Braid
To start the braid, take a small section of hair from the first row and divide it into three equal parts. Take the left strand and cross it over the middle strand, then take the right strand and cross it over the new middle strand. This is a basic three-strand braid.
Step 4: Adding Hair to the Braid
Next, you’ll need to add in more hair. To do this, simply take a small section of hair from the front of the row and add it to the left strand before you cross it over the middle strand. Repeat this process with the right strand. Continue braiding and adding hair until you reach the end of the row.
The addition of braiding hair, however, is another process. Take a small bit of the braiding hair extensions and feed it in as you braid intermittently.
Step 5: Repeating the Process
Repeat the braiding process for each row until all your hair is braided. You can alternate the direction of the braids for a more natural look, or braid all the rows in the same direction.
Step 6: Styling Your Braids
Once all your hair is braided, you can style your braids in any way you like. Some people prefer to leave the braids loose, while others may choose to add accessories like beads or rings. You can also braid the braids together to create an updo, or twist them into a bun.
How Long Do Feed-in Braids Last?
The lifespan of feed-in braids varies depending on factors such as the tightness of the braids, the texture and thickness of the hair, and the maintenance routine of the wearer. On average, feed-in braids can last anywhere from 4 to 8 weeks.
However, with proper maintenance, they can last longer. It’s important to regularly check the tightness of the braids and loosen any braids that may have become too tight to avoid damage to the hair and scalp. Ultimately, the longevity of feed-in braids will depend on the individual and their specific hair and scalp needs.
How Many Packs of Hair for Feed-in Braids?

The number of packs of hair needed for feed-in braids depends on several factors, including the desired thickness of the braids, the length of the hair, and the size of the braids. As a general rule of thumb, here’s a rough estimate:
- For a full head of small-to-medium-sized feed-in braids, you may need 4-6 packs of hair.
- For larger or thicker braids, you may need 6-8 packs or more.
- For shorter hair, you may only need 2-4 packs.
It’s always better to buy a few extra packs of hair to be safe, rather than falling short and having to purchase more in the middle of the braiding process. Additionally, the type and texture of the hair can also affect the number of packs needed, so it’s best to consult with your stylist for a more accurate estimate.
How to Maintain Feed-in Braids
To maintain feed-in braids and keep them looking neat and healthy, here are some tips:
- Keep the scalp moisturized: Regularly apply a light oil or moisturizer to the scalp to prevent dryness and itching.
- Avoid excessive tension: Be gentle when handling the braids and avoid pulling or tugging, which can cause breakage and damage to the hair and scalp. Traction alopecia, a hair loss brought on by excessive pressure applied to the scalp can be caused by overly manipulating the braids.
- Wrap the hair at night: Use a silk or satin scarf or bonnet to wrap the braids and protect them from damage while you sleep.
- Limit exposure to water: Avoid getting the braids wet as much as possible, as water can cause the braids to loosen and the hair to become frizzy. If you must wash your hair, use a cotton ball dipped in a sulfate-free shampoo and dab gently at the scalp. Repeat the same procedure for the conditioning process and gently blot to dry with a towel instead afterward.
- Refrain from using harsh products: Avoid using heavy oils, gels, and other products that can cause buildup and lead to a greasy or weighed-down appearance.
- Touch up the Edges: A well-laid and sleek edge is the definition of a complete look! It is easily achievable with edge smoothing tools– gels, brushes, and conditioners.
