
Braid Hairstyles
How To Do Viking Braids: Easy Step-by-Step Process
Oct
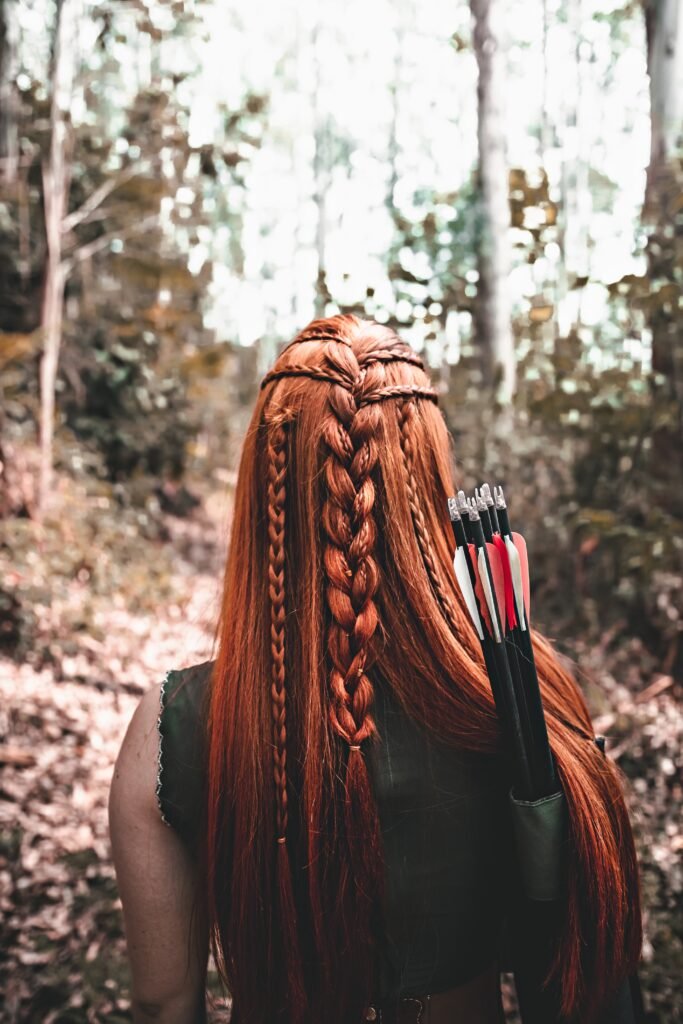
Viking hairstyle has a rich cultural heritage and also screams badass! And, that’s about a favorite thing with this braided hairstyle, and can be particularly difficult to create as it could require different types of braids giving off a classic yet slightly roughed-up aesthetic and an edgy look.
What is a Viking Braid?

Let’s get into history! The Anglo-Viking women wore a variety of hairstyles. Two hogback stones from Lowther, Cumbria depict women with their hair worn in two braids, falling to either side of the head beside the cheeks. The hair holds symbols and meaning to the Vikings.
Vikings in this case refer to the ancient Germanic people and was a term for sea-borne raiding and adventuring in old Norse” to go viking” the modern braided Viking hairstyles aren’t entirely accurate but it does get the job done with the edgy and baddie vibes!
The braided styles typically involve a combination of a variety of braids ranging from Dutch braid, fishtail braid, French braid and so much more! However, this article would provide details on how to attain an easy and classic Viking braided style without requiring so much prior information on previously listed braids.
How to do Viking Braiding: An Easy Step-by-Step Process
This style works best if you have a hit of texture in your hair, so either don’t wash your hair the day before or comb some gel into the sections to be braided. for extra staying power. If you have a very fine hair texture, spritz on a texturizing spray or volumizing powder for grit and volume.
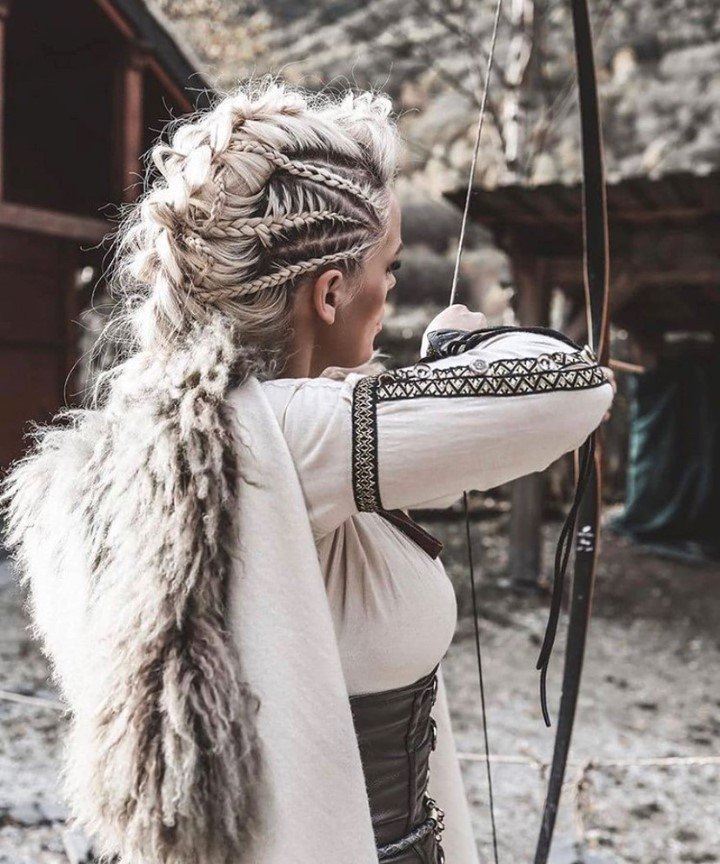
This trendy style, popularized by the television show Vikings, consists of 2 braids on each side of the head and a French braid in the middle. Then, all you have to do is braid the side sections, followed by the top section, to complete the look. And, you are slaying in style!
To begin, section your hair, you’ll be creating multiple braids for this look, dividing your hair in bits makes it a more manageable process and allows for a better result. Make use of hair ties, and claw clips, any hair clips would work just fine to separate the hair pieces.
1. Section of the top middle part of your hair, from around the center of your eyebrows back curving the part slightly. Thus, creating a horseshoe section giving off a mohawk appearance. And, on the sides– left and right, split hair in halves clipping the lower portions out of the way to begin to either Dutch braid or rope braid!
2. Braid the upper section in a Dutch braid! Or rope braid– this involves splitting the section of hair into 2 pieces at the hairline for the rope braid. Twist the left section and the right section to the right a few times, working in an opposing manner, and then cross them over each other. Next, hold the strands and add in hair from the right section to the right twist and twist and add in hair from the left section to the left strand, twist, and cross over again.
This process is repeated as you work downwards the section, holding the hair tightly as you braid, at the end of the section, either do a standard two-strand twist by simply layering the strand over the other till the tips of the strands are reached or split into three hair sections and do a standard three strand braid.
Keep repeating this movement while keeping them close to your head. You want the finished effect to be tight against your head, like a cornrow, so make sure you are holding the hair taut as you work
3. Repeat the exact braiding process on the sides that is if you were rope braiding the left side, do the same for the right! To Dutch braid, Grab a section and split it into three equal hair pieces at the hairline with the pinkie holding the left strand and the middle finger, the centerpiece all held at the left hand and the right strand at the right hand. The finger positioning is paramount to the outcome and orderliness of the braids.
After crossing the left hair part under the center one, you should do the same with the right section. It’s time to begin to add in more hair. Combine the existing left section with a short section of hair that is already down on the left side. Cross them both under the middle as usual. Next, repeat the process on the right side by combining the right part with some hair. The entire technique is to cross that combined segment under the middle section. Keep braiding till the hair section is completed!
4. Now, you’ve got two braids each at the side. Comb through the horseshoe section and do a French braid, an enlarged Dutch braid works as well, after making the Dutch braid, you tug at it gently, giving it a voluminous and eccentric look. To French braid, take a small front piece of the hair section and split it into three.
The three sections: the top strand, middle strand, and bottom strand should be taken into account to help in guiding the braiding process. Take the top strand and cross it over and into the middle, and grab the bottom strand and cross it over and into the middle likewise, make sure your hair is pulled tightly in the process.
Next, add a small section of hair to the top strand and cross the top strand over and into the middle. Do the same for the bottom strand, pick up a small section of hair ensuring it’s not more than the quantity added to the top strand and cross it over and into the middle. Keep repeating the process as you work toward the end of the section.
5. Now, the braiding process is complete, note that you can decide to braid completely rather than halfway, it depends on your preferred look. Follow up your braids with accessories, and add beads for a touched-up look. And, backcombing whatever hair is left can add or create a tousled messy appearance which is the real deal with Viking braids. The beauty of the style lies in its messiness, so don’t worry about it coming out perfectly!
6. Apply hairspray to your Viking braids. Spray hairspray all over the hairdo once you’ve completed braiding, teasing, and securing your braids. This will ensure that your braids endure all day and hold all of your artistry in place.
Conclusion
Viking hairstyles need a lot of work, yet one of their main advantages may be that they are temporary. The braids are meant to be worn for a day, but they can remain longer if you wear a silk or satin head wrap to bed, which holds the style in place because of its smooth surface.
The Viking braid is a lot of fun! Additionally, you will undoubtedly need a stylist’s help if you are not an experienced DIY braider. Because the Viking braids need the blending of several different braids, be sure the person you choose is skilled in their trade and capable of pulling off the style.
